运行环境
字符设备基础知识
写一个简单的字符驱动程序,需要内核里的以下几个头文件,因为需要调用一些基本的宏和一些基本的函数来使用。
1 | #include <linux/cdev.h> |
进入Linux内核源码,进入include/linux/,打开cdev.h
1 | struct cdev { |
里面还有部分函数,我们暂时只需要cdev_init,cdev_add,cdev_del。
然后打开kdev_t.h
1 | #define MINORBITS 20 |
创建设备号就需要kdev_t这个宏,创建设备号后还要对设备进行注册,这时候需要fs.h这个头文件里的函数,注册和释放。
1 | extern int register_chrdev_region(dev_t, unsigned, const char *); |
编写简单的字符设备需要以下步骤:
- 创建设备号
- 注册设备号
- 退出驱动时,注销设备
创建设备文件,利用cat /proc/devices可以查看申请到的设备名、设备号,这里贴出部分代码:
1 | //创建一个字符设备 |
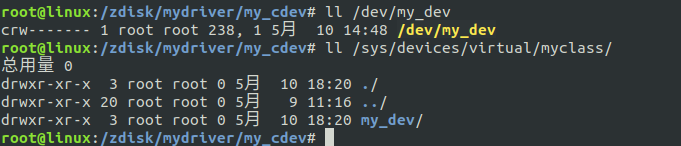
自动创建设备节点
利用udev(mdev)来实现设备文件的自动创建,首先应保证支持udev(mdev),由busybox配置。
在驱动用加入对udev 的支持主要做的就是:在驱动初始化的代码里调用class_create(…)为该设备创建一个class,再为每个设备调用device_create(…)创建对应的设备。
内核中定义的struct class结构体,顾名思义,一个struct class结构体类型变量对应一个类,内核同时提供了class_create(…)函数,可以用它来创建一个类,这个类存放于sysfs下面,一旦创建好了这个类,再调用 device_create(…)函数来在/dev目录下创建相应的设备节点。
这样,加载模块的时候,用户空间中的udev会自动响应 device_create()函数,去/sysfs下寻找对应的类从而创建设备节点。
这里贴出部分实现代码:
1 | struct device *my_device; |
实现效果如下图:
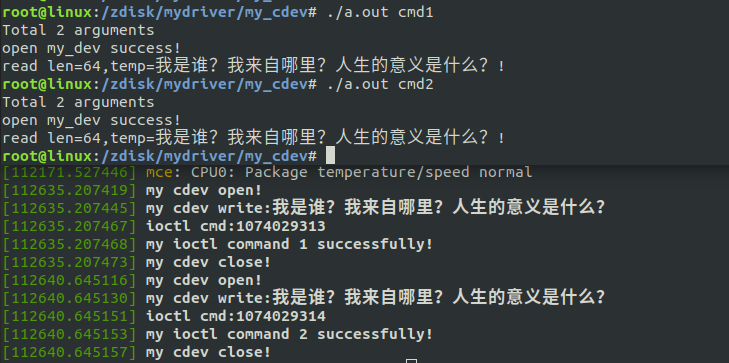
为驱动添加open()、read()、write()、ioctl()函数
当一个字符设备被注册后,我们随即就要来操作这个字符设备,open , read , write , close等操作,需要file_operations这个结构体:
1 | static const struct file_operations __fops = { \ |
那么内核是如何去识别相应的函数呢?
是通过系统调用
在上层应用程序,打个比方。
通过open()打印相应的设备,那么syscall函数就会通过系统调用号识别到内核态里的函数,进而调用到我们这里实现的my_open,这就是内核态和用户态相互沟通的方式
这里贴出部分代码:
1 | //创建函数,这里就不写出具体实现了 |
最终效果图
项目源码地址:https://github.com/huchanghui123/my_cdev
参考博客: